Scientific videos or video abstracts are an incredibly powerful way to attract attention to your research project and to yourself. Such attention can then turn into citations to your research papers, it can lead to collaborations and many other opportunities.
I know this first hand since I can, without a doubt, attribute a large part of my success as a scientist to the animated scientific videos I create for my research projects (see them in my YouTube channel ). Basically, whenever I publish an important research article, I try to produce a video where, in simple language, I explain the findings using visual aids. When I post such a video abstract on social media and on YouTube, I add a link to the respective research article for driving readers to it.
The video below is the one that started it all. I made it during the last year of my Ph.D. in 2014 and even now, years later, it is still bringing in collaborations. This video is probably one that has ensured me the most contracts with the industry.
In this article, I want to reveal to you all the secrets and tricks that I know about creating scientific videos.
You will learn:
- How to create a script for a scientific video (including a free template)
- Best apps for creating a research video (including a free PPT template)
- Science video editing tools
- Creating graphics for science videos
- Gear for creating research videos
- Getting help with creating scientific videos
- Where to post scientific videos for maximum exposure
Before we dive into the creation of scientific videos, let me give you some ideas for the various situations in which you could use one:
- Upload on YouTube or Vimeo for rising interest in your research and driving traffic to your journal paper.
- Add a video abstract to your paper (by adding it directly in the paper and on the journal website).
- Use a short video during a presentation to focus any daydreamers.
- Use a video as a social media status update about your latest field trip.
- Film a video that adds to the explanation of methodology for your newest journal paper.
- Develop a promotional video to help your new research project get traction.
- Use a video in a class lecture to demonstrate a particular scientific phenomena.
- Add a video of your research process or computer simulation to a journal paper.
- In a workshop, use a video to show people how your new test method works.
- You could even make a video featuring yourself to use in addition to your CV. This will not only attract attention, but demonstrate your out-of-the-box thinking.
These are just some possible applications for a scientific video. Learning to create videos will open many new ways for attracting interest to your research, educating others about science, and capturing the attention of your audience during a conference presentation.
How to create a script for a scientific video
To create a scientific explainer video, you will first need to come up with an idea, decide what exactly you want to show in it, what footage you will use, and what will you say.
Often your plan will be to explain your newest research paper and you might think:
“Why do I need a script? The paper is the script”.
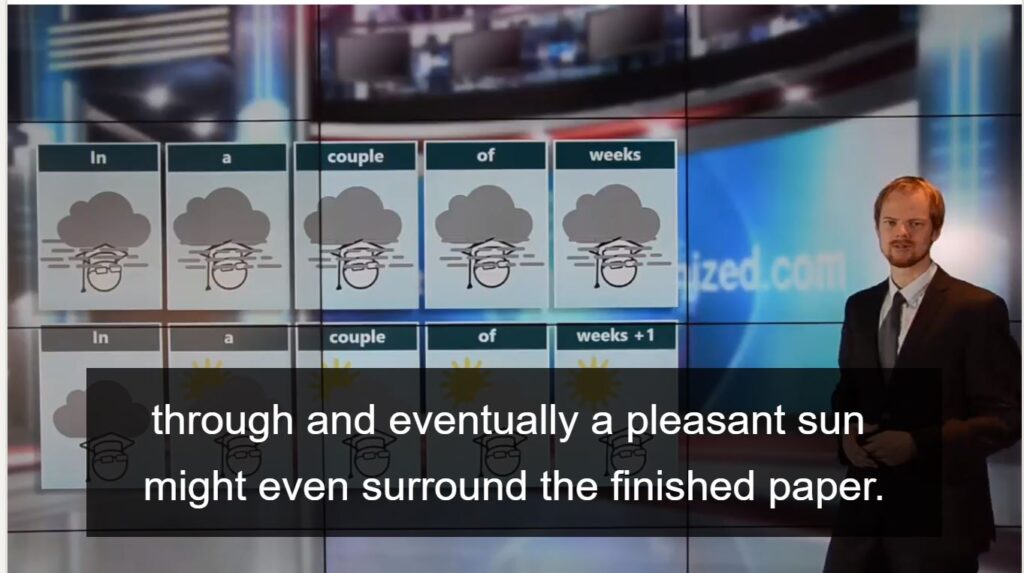
I’m sorry to disappoint you. When writing a journal paper it is required to move from the known to the specific. We start with a broad overview in the introduction, then narrow down to the methods we used before arriving at the results, and finally lay out the conclusions.
Because people normally consume videos (and any other content) on the internet differently than they read a research paper, repeating the sequence from a research paper is way too long of a wind-off. In fact, a study by Microsoft showed that the attention span of people in recent years has dropped to 8 seconds. Don’t waste these 8 precious seconds providing boring background information.
When creating videos, grab the attention of people before they get blown away by the information firehouse that the Internet is.
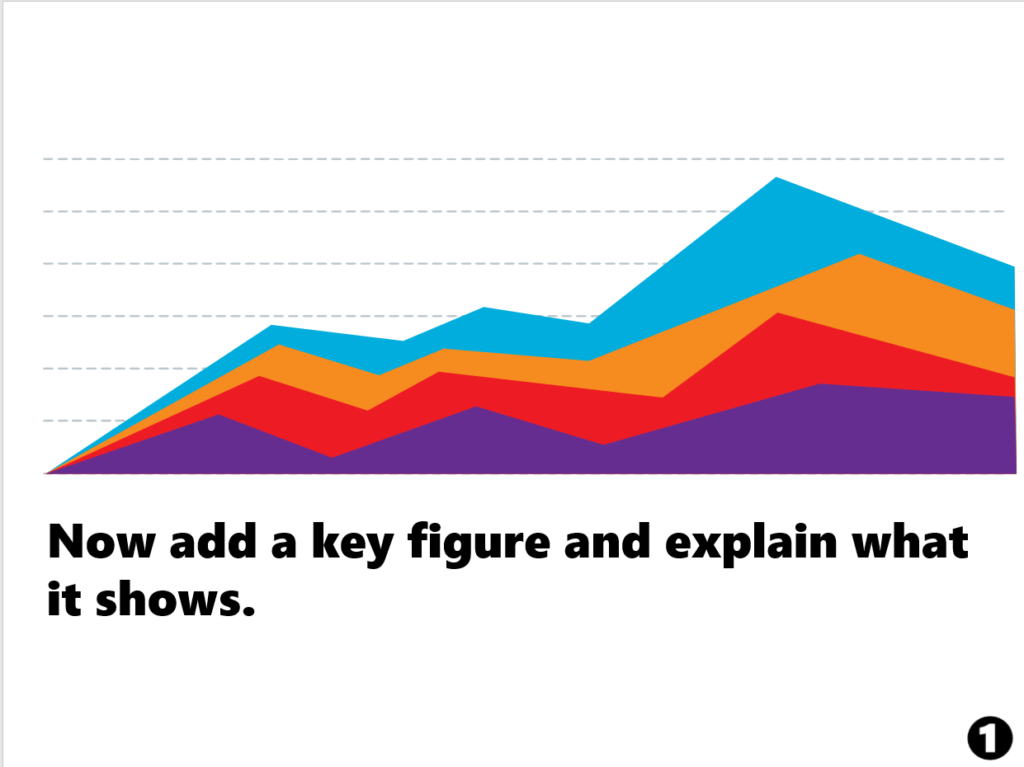
To develop content that has the chance to attract attention on the internet, it is worth keeping in mind the lead-body-tail structure. This structure is what science journalists (in fact, any journalists) normally use for news stories.
You could imagine the lead-body-tail structure displayed as an inverted pyramid shown in the figure below.
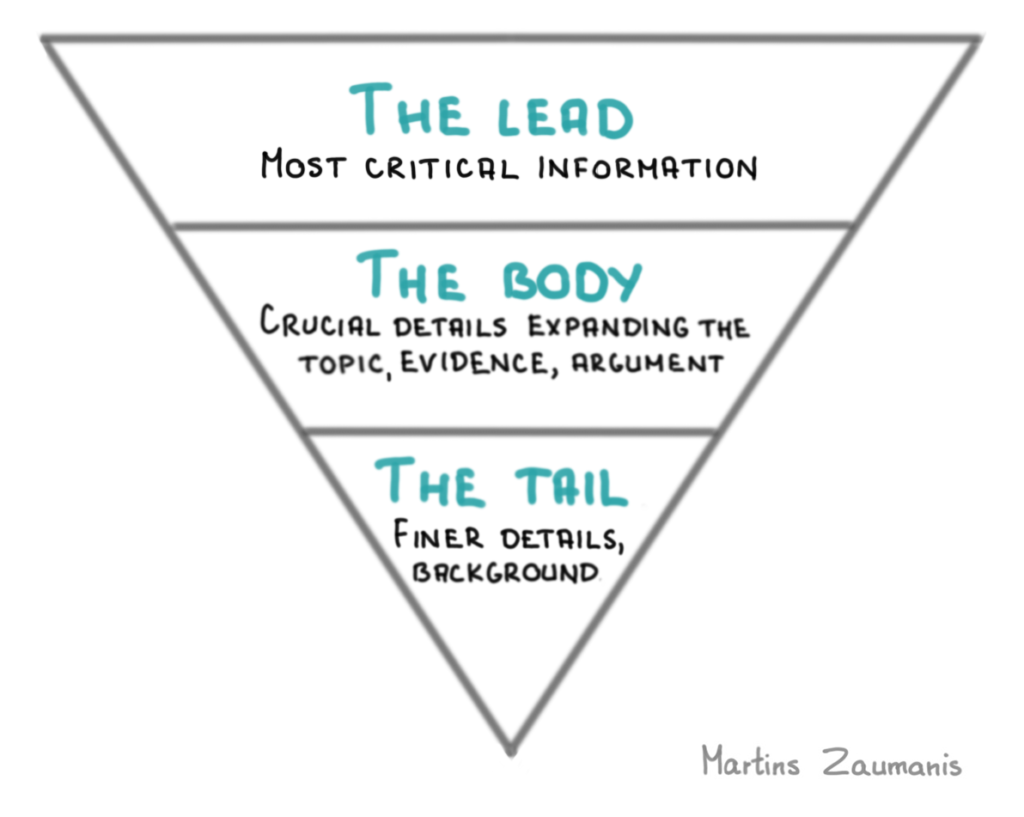
In the lead-body-tail structure, you will start with the things your audience must know, follow with what is good to know, and then finish with what would be nice to know. Here is an example of how you could structure the argument:
- Lead: Start with the most critical information that captures the interest of your audience. This could be a problem statement or an unanswered question. After this short introduction, you could provide a preview for how your research solves that problem.
- Body: Next, explain the crucial details of your research. To do it, you could provide evidence and logical arguments from your research or other studies. You could even throw in a anology or a joke that makes the content light and easy to understand.
- Tail: Finally, reward those who have stuck with your video until the end by offering finer details about the methodology, and any background information.
Another thing to remember when creating a video script is deciding who is your target audience. Knowing who you are addressing will allow you to define the level of detail of your video. For example, jargon might be okay for researchers in your domain but reaching out to a wider public requires a broader perspective and less terminology.
In a video made for a broad non-specialist audience you want to sell the result, not the features.
A science video script template
Once you have the general idea for your new video and you know who your target audience is, develop a script. A script could be as simple as a table with the following columns:
- Time: time or duration of the scene.
- Action in the video: the activity in the video scene.
- Voiceover / dialog / captions: the information conveyed to the viewer through voice or captions.
- Other columns, depending on the type of video you are making, these could include props, characters in the scene, editing effects, music, shot type (e.g. close-up, zoom), and scene number.
Below you can download a script template to use for your videos.
As an example, here is a script created by the great staff of Lib4RI for a video that I took part in (both the video and the script are licensed under CC BY-NC-ND 4.0 license). The video described in the script is a fun take on the struggles of a researcher to find funding for open access publishing. Watch it to see how it compares to the script.
Best apps for creating a research video
After developing the script, you will need to create the video footage. You could do it using a camera and a microphone alone, but to leave a more lasting impression, you could use images, drawings, animations, and presenting software.
What follows are some apps that you can use for creating a science video. We will discuss the apps for editing footage later on.
PowerPoint
Rarely anyone knows this, but PowerPoint might be the only tool you need for creating a simple scientific explainer video. The major advantages of relying on PowerPoing is the familiarity of this tool and the fact that most scientists will be able to access PowerPoint for free since it is available on most PCs owned by universities.
See below a video that I created using nothing but PowerPoint.
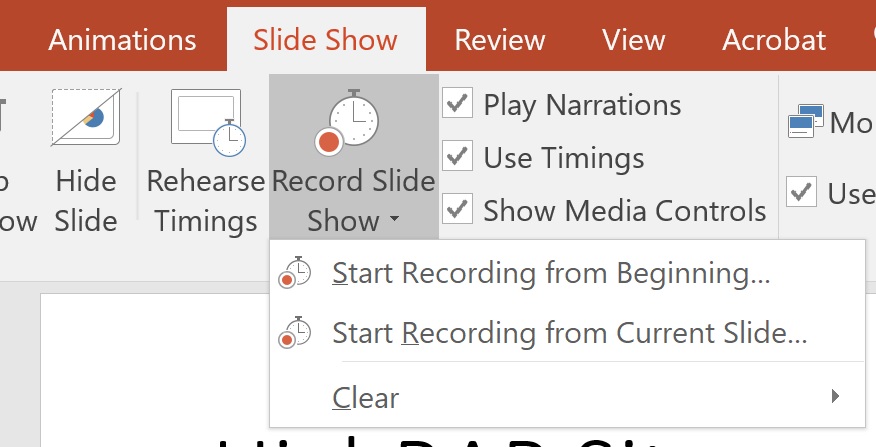
To create a video in PowerPoint, you will want to open the Slide Show tab and click on “Record Slide Show”.
You could directly add the narration while you are recording the slide show. In my experience, though, it sounds more professional if you have recorded and edited your voice beforehand using a different app.
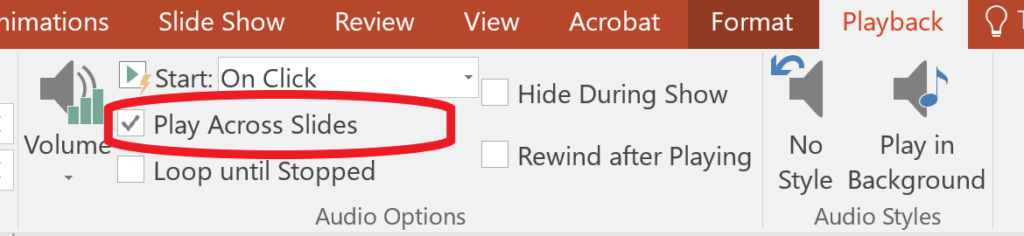
To add a pre-recorded narration, drag the audio file in the first slide of your presentation (see below apps for recording the voiceover). To make the file plays back throughout your presentation, under the “Playback” tab, tick boxes for “Play Across Slides” and “hide during show” and set it to “start automatically”.
After finishing recording the slide show, click on “Export” and select the “Create a Video” button.
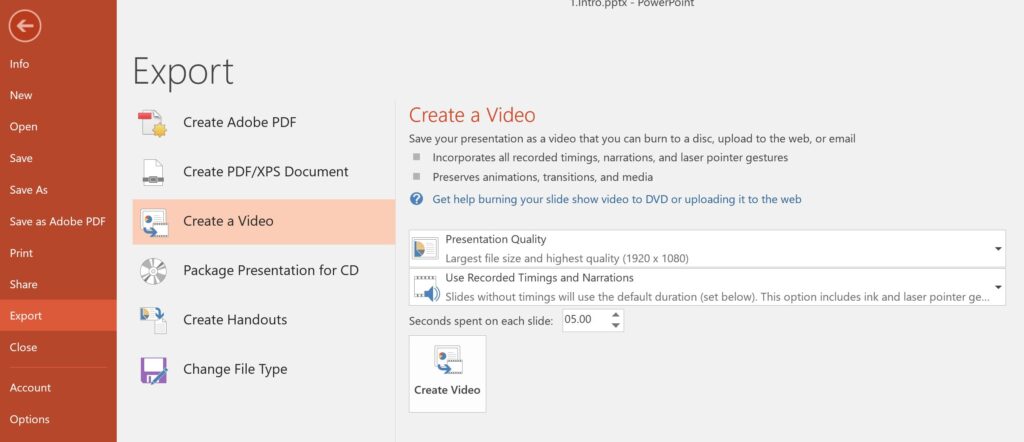
That’s it. Your video is ready for prime time.
Creating a short GIF for social media using PowerPoint
Powerpoint can also be handy for short video presentations that showcase your research on social media. In this case, you would not even need to record a voiceover. In the video below Mike Morrison explains why such a short video makes sense.
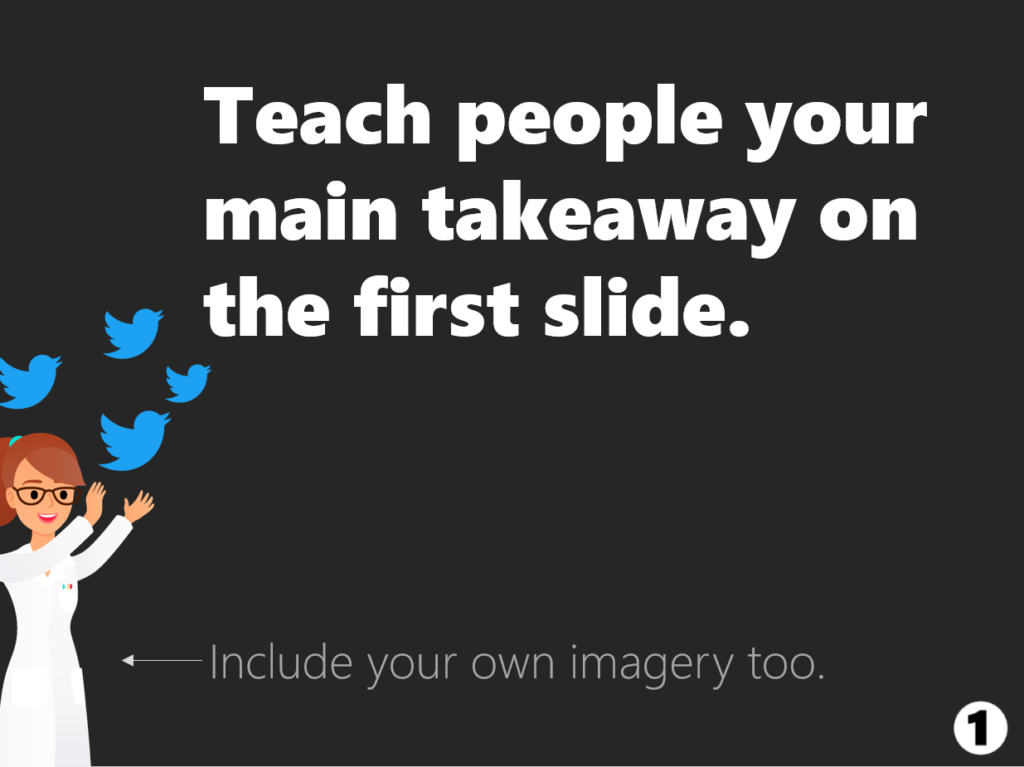
Mike Morrisson has created a template that will allow you to create such a video abstract in a breeze. All you will have to do is add information about the research in up to 5 slides and export it as a GIF.
That’s it, you can now post it on Twitter and it should grab the attention of the casual scroller much better than a static image that people normally put when they publish a paper. You can download the template below.
You will download this Twitter video writing template
Prezi
Prezi Present allows you to create a virtual space through which you can move and zoom in and out. Using this in a video can help to make your point, especially to demonstrate how various parts of your research are connected. The zooming feature can also be a great way to highlight the global significance of your work and then zoom into the details of what you have accomplished.
Of course, there will be some learning curve before you can comfortably use Prezi, but I can testify from my own experience that it is worth it. Many of my explainer videos are made using Prezi, including the one below.
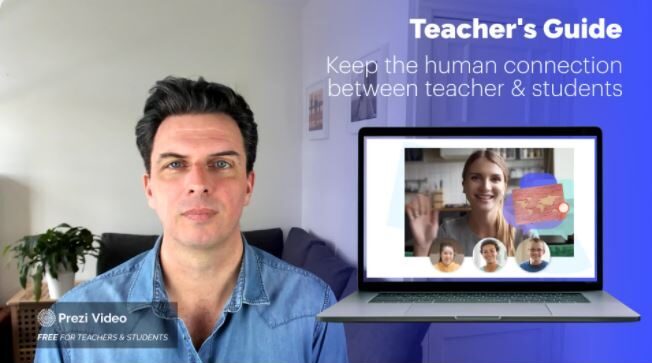
I used to create my videos using a screen capture software, but not Prezi offers to record a video presentation using Prezi Video. You can even record a video where your face is alongside your Prezi presentation. This is looks something like the screenshot below.
Prezi Cost: Free for 5 initial projects and then 3/USD month if you have an .edu email address.
Videoscribe
VideoScribe allows creating whiteboard-type videos like the one below. If done right, such videos offer a great way to attract attention to your research.
There is a slight learning curve to learning the bells and whistles of the app. For example, you will have to set the sequence of illustrations, the duration of each drawing motion, add sound, and make other tweaks.
You will also need images in .svg vector format to allow animations. If you simply upload .jpeg or .png type figure, the app will not know which lines to trace and will simply sort of “paint” the whole picture at once.
The app holds a reasonable library of images that might be useful in some situations. If you can’t find what you need, you will have to create them on your own or find online (keep reading to see how to do it). If you only have the figure in .jpeg or .png form, one workaround is to use Adobe illustrator to “trace” the lines in a figure and then save the file as .svg.
Price of Videoscribe: 39 USD/month. For the videos that I have created, I made sure that I finish the project before one month is over. Then I unsubscribed from VideoScribe until the next time I had to make a video.
I made the video below using VideoScribe and my own drawings. It is linked to a review paper that I wrote and I actually put a link to it in the research paper itself. Many publishers nowadays allow to embed videos into the article.
There are certainly alternatives to VideoScribe (for example Doodly). Even PowerPont has added an option for creating whiteboard-style videos. To make one, you can use the animations tab and click the “Ink Reply” feature (not available on all PowerPoint versions). To use this feature, you will have to create the drawings right there in PowerPoint.
Vyond
Vyond allows to create animated videos. You know, the ones that feature cartoon-like characters that talk and move around. If made well, such a video will definitely attract the attention to your research project.
The price of 249 USD/year for the cheapest version is a lot. One thing you could do is make a video using the 14-day free trial. It will have a Vyond logo in the corner though (by the way so will the cheapest paid version). To remove the watermark, you will have to open your wallet to a whopping 649 USD/year. Perhaps you could ask the outreach department of your university if they are willing to get the subscription?
The video below was created using Vyond. Besides being an example of what the app can do, it’s a great explanation of #betterposter design for scientific posters. You can download the #betterposter template here.
Other apps for creating a video abstract
The tools listed above certainly can offer many great ways to create and edit scientific videos. But every so often, new apps appear that capture the attention of the internet. Pay attention to this. Whenever you see that cool video that everyone is sharing, think about what tools were used to create it. Perhaps learning to use the particular app is simpler than it seems.
Science video editing tools
Once you have created the draft footage, you will need to edit it down into the desired sequence, add a soundtrack, create transitions, add special effects, write captions or do whatever else your script requires.
Some of the apps I listed above will allow you to natively finish the whole project. But in some cases you ming need to to some post-processing to achieve the desired effect. This means that you will need to learn using video editing software, at least to some degree. Here are some of the tools that I have tried out and can recommend.
Camtasia
Camtasia is my go-to app for screen recording and video editing. Its intuitive interface makes it quick to learn for anyone without video editing experience. It might lack some features that the more advanced editors have, but for the absolute majority of projects, it will be good enough. The only problem I have with it is that for projects with a lot of video tracks, many cuts, and special effects, it tends to crash. So I save backups often.
Price: 199 USD if you have an .edu email address.
For creating the video below I used Camtasia to first capture screen on different apps. Then I cut them using Camtasia and put together in one video along with the voiceover.
ShareX
ShareX is an open-source screen recording app. Since it is free to use, it is a good option for the researcher on a tight budget.
Adobe After Effects
Adobe After Effects is a professional-grade video editor. For the average researcher that wants to create a scientific video, this app will be overkill. The apps will definitely take a lot of time to master everything that it has to offer, but if you want to make something really special, like adding effects, or using premade templates, you will probably find no better tool.
Price: 20.99 USD/month for the Adobe Creative Cloud which offers many other tools. Before subscribing, though, check with your university. They often have a PC with Adobe Creative Cloud somewhere on the campus for researchers to use.
I used After Effects to make the video below. It was necessary to use After Effects rather than any of the simpler tools because of the fancy intro that I wanted to add in the video to make it feel like an authentic news piece. I think the hours I spent fiddling with it were worth it. Don’t you?
The rest of the video, by the way is made using a PowerPoint presentation and a large screen. There was no studio involved and I was working in absolute solitude.
Audacity
Audacity is an audio recording and editing app. It is open-source meaning that it’s free. I use it to record the voiceover for all my videos.
A very handy feature Audacity offers is noise removal. By using it, you can discard the background noise, and remove any clicks or other unwanted sounds from the record. This feature is especially useful in case you use your phone or a simple headset to record the audio. Using the noise removal function will make the voiceover sound a little more professional. Price: Free.

Voice recording apps for smartphone
There are countless apps that allow you to record voice on your phone. My favorite for my Android phone is the Recorder by Google. It will record the voice like any other app but has the advantage of being easily synchronizable with my Google Drive account. This means that as soon as I finish recording my voice, I can send it to my PC and edit using Audacity or any of the video editors that I mentioned before.
Creating closed captions
Closed captions are the text version of your voice. Having the closed captions can be especially useful for posting videos on social media This is because many people by default have the sound turned off.
There are many sites will will allow you to create the closed captions, but in my experience YouTube is all one needs. Once you have enabled the option to create closed captions, first make sure they are correct. In my experience YouTube does a fairly good job in transcribing voice, but there are always some glitches so I always read through.
Once you are satisfied with the result, you can download the closed captions (YouTube calls them subtitles). Many social networks, including Facebook and LinkedIn only accept SRT format for closed captions. To download the SRT file from YouTube, go to the desired video through your Creator Studio, click on Details and select Subtitles. Now click on the three dots next to the Edit button and you will be able to download the SRT file. Save this file and upload in any other platform along with the video.
Creating graphics for science videos
When creating a video, you might need some graphics, scientific illustrations, icons, or other types of visuals to make your point. If you decide on creating a video using animations, you might need a lot of them.
Regardless if you would like to create your own illustrations or download and legally use something that others have already created, read this article. In it, I review and compare many different ways for creating and editing graphics. I also offer websites to find free-to-share visuals made by others.
Create a thumbnail for your video
Even though the saying goes “Don’t judge a book by it’s cover”, people certainly do judge a book by its cover. The same goes for a science video. Just like a book’s cover, a great thumbnail for a video has only one main task – generate enough interest so that people would click on it to watch the video.
To create the thumbnail, usually you would add a short intriguing text to a screenshot from the video. To get some ideas, check out the thumbnails for the videos of your favourite creators on YouTube.
You can make the thumbnail with almost any graphics design program, including Microsoft PowerPoint, Adobe Illustrator, Inkscape, or anything else. The problem with using these apps for creating a video thumbnail is that you will have to start from a blank slate.
I have found that Canva is a great website to create visuals, including video thumbnails. Canva offers many free templates for a particular social media site. I would first type “thumbnail” followed by the name of the social media site in the search box. This returns a range of free templates that I have the right dimensions and serve as the base for my creation. I would then upload a screenshot from my video and edit the text to make it fit for my video.
Adding special effects to your video abstracts
Motion Array
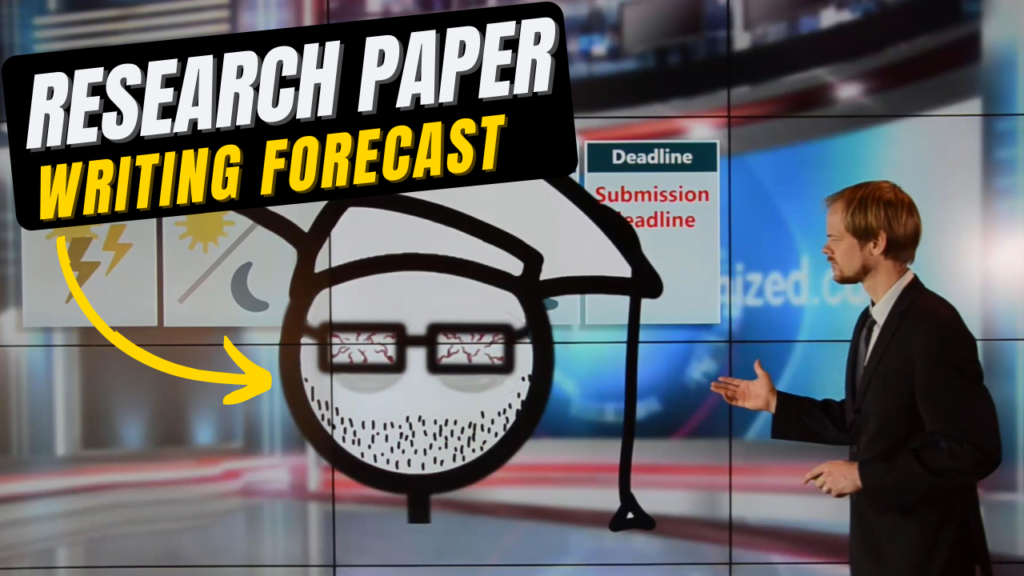
Motion Array is a library of stock videos, special effects, sound effects, music, templates, and other resources for creating professional-looking videos. My limited comparison of the options for my own video projects turned out this as the best alternative in the price/library size scale. Among other things, I used it for the Research Paper Writing Forecast that I showed to you above. Price: 29.99 USD/month.
Gear for creating research videos
If you decide in favor of shooting your videos (rather than creating them using one of the apps we reviewed), you will need to have some hardware. Here is a list of what I have found useful.
A camera

The obvious first requirement if you want to film a video (as opposed to creating one using graphics or animations) is a camera. Considering how good the cameras in modern smartphones are, don’t think any further. Use the camera you already have. It will be perfect for most cases. Plus, it is always in your pocket so that you can film on the go.
A portable tripod
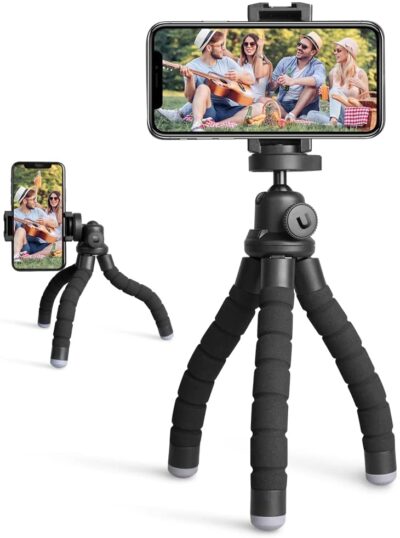
A tripod for a smartphone will be useful if you want to make a video of yourself without having it look like a selfie. It can also be useful for recording an experiment in the lab or even to create a timelapse of a field day.
There are of course fancy large tripods and they have their use. But I have found that one of the most practical tripods is the one you see in the picture. Besides being able to place it on a flat surface, you can use its’ flexible legs to wrap around objects. In many cases, this can be extremely useful to film an experiment. And considering how small it is compared to the full-blown tripods, you can just dump it in your bag to sit there for whenever you might need it. Mine is in my backpack most of the time whether I need it or not.
It’s cheap too. Here is one for 16 USD.
A light for filming
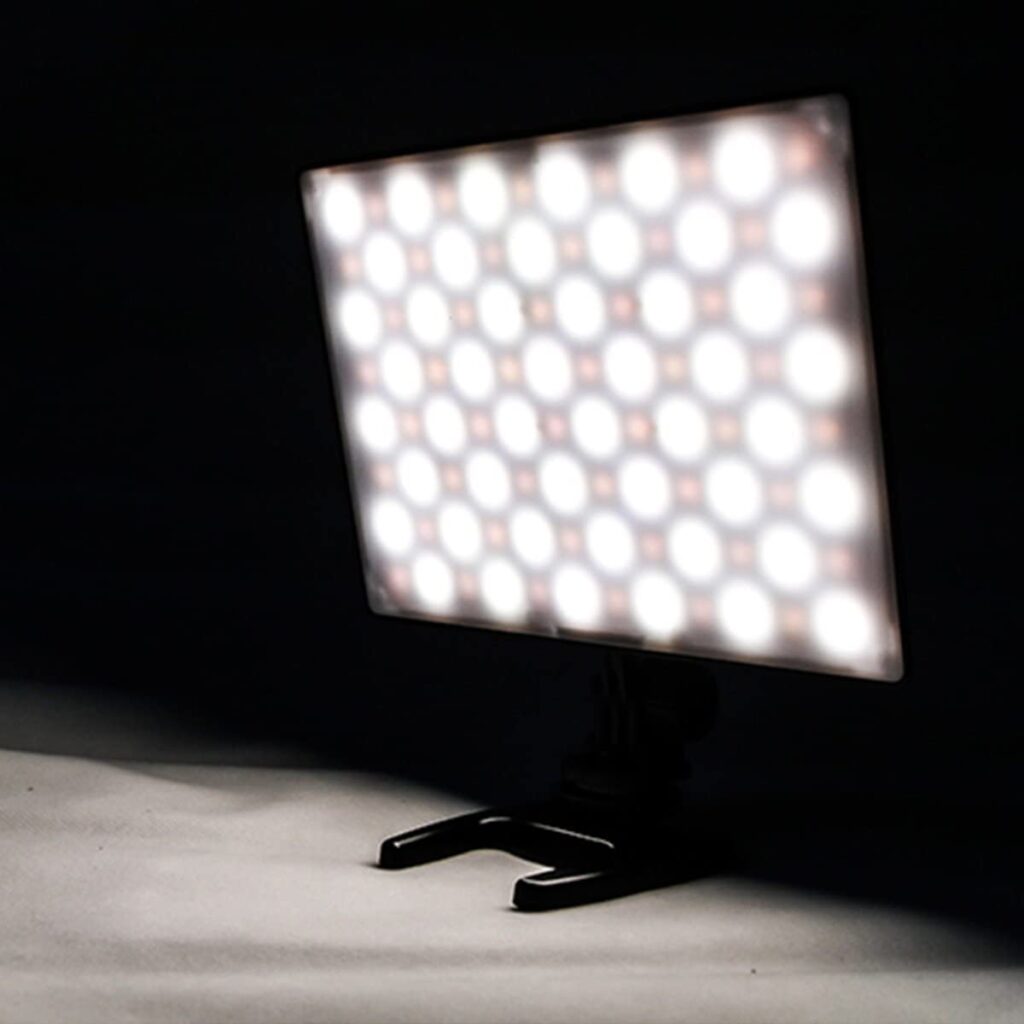
With a good light source, even a bad camera will be able to shoot great-looking videos. The opposite is not true. Even the most expensive camera with whatever night-time features it promises, will not be able to make a good video if the filmed subject is dimly lit.
If you want to film your face or perhaps an experiment, it might be worth investing in a light. I use YONGNUO YN300 for my camera but cheap selfie ring might be all you need to film selfie-style videos. When making the decision, pay attention to the maximum light output, the mechanism to secure it on or next to your camera, and the ability to move around, if you need it.
A video stablizer
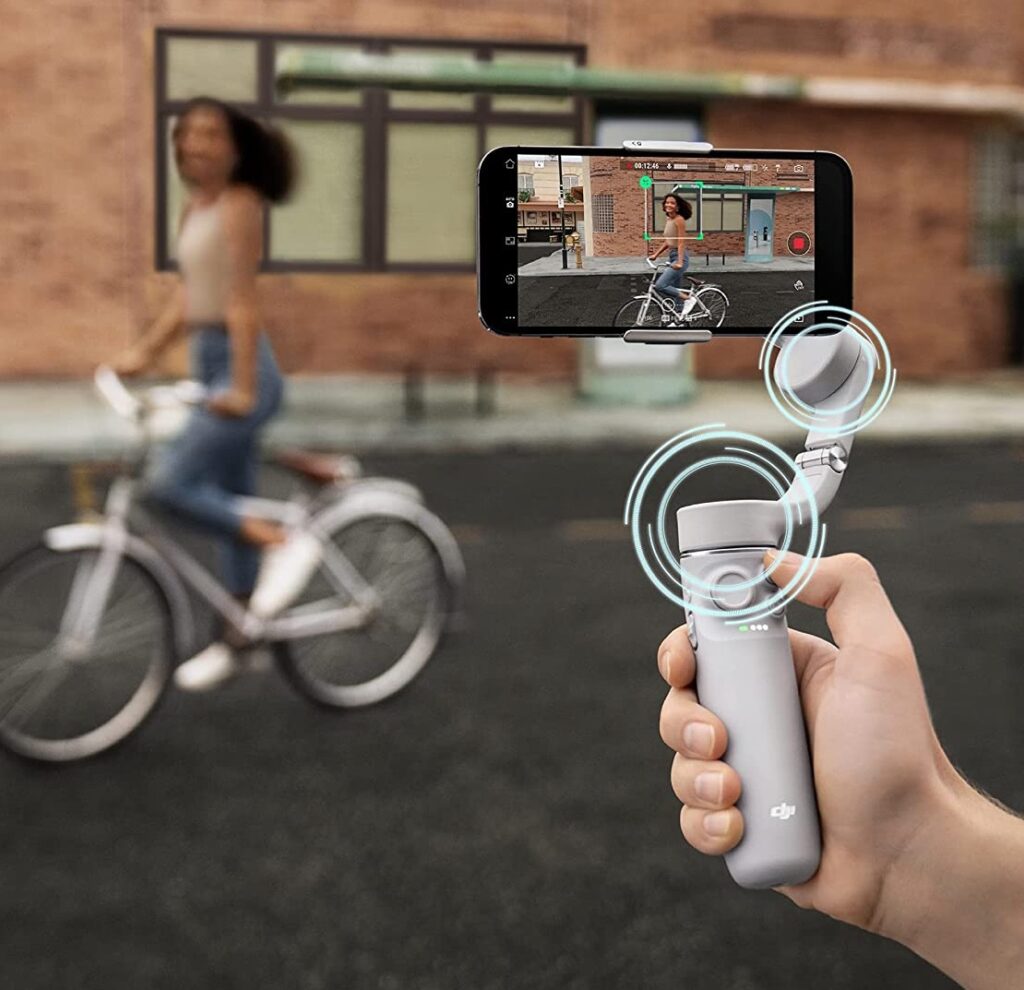
Even though modern smartphones do a great job in stabilizing the video, if you want to document research field trips, it might be a good idea to invest in a gimbal stabilizer. It will make your footage stable and pleasant to look at.
An external microphone
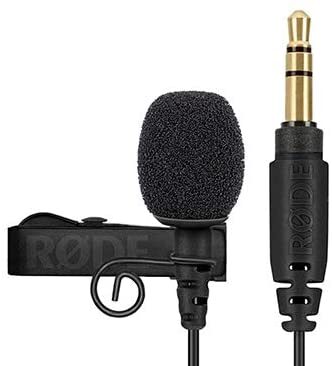
To record a narration for a video, you will need a microphone. Sure, any smartphone or PC has a built-in microphone that you could use. (I have used my smartphone microphone for almost all my scientific videos). In many cases, though, an external microphone will be a better option.
First of all, the sound quality is quite bad when recording on a smartphone. It captures a lot of background noise and the sound changes significantly depending on how far you are from the phone.
There are workarounds to these problems. For example, I always tried to find a quiet room and set the phone on my small flexible tripod to ensure it is a constant distance from my mouth. You could also use a headset with a built-in microphone.
You can also use the “remove background noise” feature of the Audacity app to make the narration sound more professional.
After trying our different options, I decided to invest in a microphone. In many cases, for a researcher, the best type of microphone will be Rode Lavalier GO or a similar lavalier microphone. It definitely has better quality than any smartphone microphone. If you choose the Lavalier Go, you will need an adapter, though, to connect it to your smartphone.
The advantage of a lavalier microphone is that it can be attached to your clothes meaning that a constant distance will be maintained from your mouth when you record the narration. Plus, it captures significantly less background noise compared to a smartphone microphone.
Finally, a lavalier microphone will ensure a better narration quality for videos shot in the lab or during a field trip. This is because a smartphone microphone records sound from all sides and the loudness of your voice will change depending on how you and other sources of sound are located with respect to the phone. With a lavalier microphone attached to your clothes, your voice will always be consistent and more prominent than other sources of sound.
I have spent a lot of time explaining microphones. If you think the sound quality is so important, just ignore my advice on this one and keep using your smartphone. Sound quality definitely is not as important as a good script and appropriate graphics for an explainer video.
Getting help with creating scientific videos
Let’s say you have a great idea for a scientific video but don’t have the skills or time needed to create it. Thankfully with the advance of freelancing platforms, it is quite easy to find someone who can do the job for you without breaking the bank. Here are two platforms for finding freelancers.
Fiverr is a platform where you can find freelancers for many types of work, including the creation of videos. Every freelancer has a rating, so make sure to check their profile before handing out what is called a “gig”. https://www.fiverr.com/

Upwork is similar to Fiverr, except that you will create a description of the job first. Then freelancers will place bids on it. Similar to Fiverr, check the rating of the people who are offering to do the work and don’t fall for the cheapest offer. To start you will have to create a profile: https://www.upwork.com/
Where to post scientific videos for maximum exposure
Social media is the natural first destination we think of thinking about posting a video on the internet. It is certainly one (and perhaps the most important) option, but before deciding where to post your video abstract, it is worth considering how to gain maximum exposure for your videos for the longest period of time.
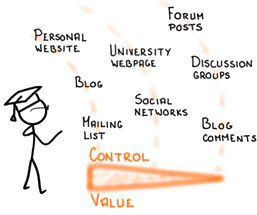
One thing to remember is that in the hierarchy of internet channels, there is usually a correlation between value and the amount of control you have over curating the content.
With every layer of managers, you give up the ability to curate the content. For example, if you post a video in a LinkedIn group of your research domain, the manager of that group will be able to decide to promote it or not. Even if he does, in a couple of days your video will be replaced by a new post.
If, on the other hand, you have a personal website, you can freely decide which videos to post most prominently and when to replace them with fresh content. The figure below shows an approximate hierarchy of online channels in terms of which provides the most value (and control) to the owner.
Post on social media
I have observed that my LinkedIn videos attract more likes than any other post type. I am not the only one who has noticed it. Different studies that track engagement with social media posts have shown that videos attract the most views on social media.
When publishing videos on social media, consider using their own native video upload tool (rather than pasting a link to YouTube). Social media platforms want users to use their platforms as much as possible so they create algorithms that favor native videos. Most notably, embedded videos are usually set to auto-play whereas linked videos have to be clicked to start playing. As an example, one study found that Facebook embedded videos are shared five times more often compared to linked YouTube videos and they attract five times more comments.
Post the videos on YouTube
Last year my videos got more than 12,000 views on YouTube, leaving views of my research papers in the dust. This is because the audience for videos is wider than for research articles. Industry professionals, for example, rarely have the time or patience to get into the level of detail that journal articles possess. Watching a summary video might provide all the information they need.
My explainer videos were the primary driver behind many industry consulting opportunities that I have had.
A study by Google (see the figure below) showed that learning something new, or satisfying ones curiosity, about a particular subject are among the top reasons people watch YouTube.
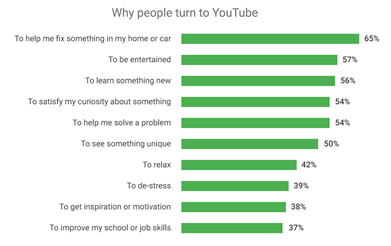
Well, it just so happens that creating something new and answering questions are among the top things that we researchers do. This places us in an ideal position to create videos that people will search for (YouTube is the second largest search engine after Google). Being a researcher certainly adds credibility to your videos.
One thing to remember is that despite the advances in voice recognition, YouTube and other search engines still rely heavily on text to decide which videos to show when people search for a certain topic. This means you should put the effort in creating the title of the video and the description below it using keywords that people might use to search for the topic.
Of course, don’t just litter the title with random keywords. The title should also attract enough curiosity so that people would click on it in the search results.
Embed a scientific video in your research paper
Videos can also be submitted together with a research paper and for some articles, I have even embedded a video in the document itself. When you view the paper online, you would see my video embedded in the document, like in this paper.
Evermore journals are encouraging to add a video to the research paper. Some journals call them a video abstract. The highly respected New England Journal of Medicine has even got a step further and offers what they call “Quick Takes” for some of their best research papers. These videos are about 2 minutes long and created by the journal in collaboration with the authors of the respective paper. See an example below.
Some people even call such videos the “abstract of the future”. Certainly in our age of attention deficit, such short summary videos could help grab the attention of people on social media.
There are even journals popping up which publish peer-reviewed research videos as a replacement of the traditional journal articles. At this time, though, the idea is still in its infancy and I wouldn’t recommend you to ditch scientific writing in favor of directing research videos 🙂
Add the videos to your personal academic website
Your academic website serves as the central hub for your online brand. People who type your name into the search box will most probably check out your website (if you have one, and you definitely should). This makes your website a great home for your research videos.
When you post your videos on social media, in a couple of days they will sink deep in the timeline never to be seen again. On your website, on the other hand, your scientific videos will always be on display to inform visitors about your research and lead them to your research papers.
On my academic website, I have made a separate section where all the videos are displayed along with a short description and links to the corresponding research articles.
To add the video to your website you can either directly upload it to the website or embed a link to YouTube (or whichever other video hosting platform you use). I find the embedding option better since it also increases the view count to your YouTube channel thus signaling the YouTube bots that your videos are interesting. This increases the chances that they will be suggested to people watching YouTube.
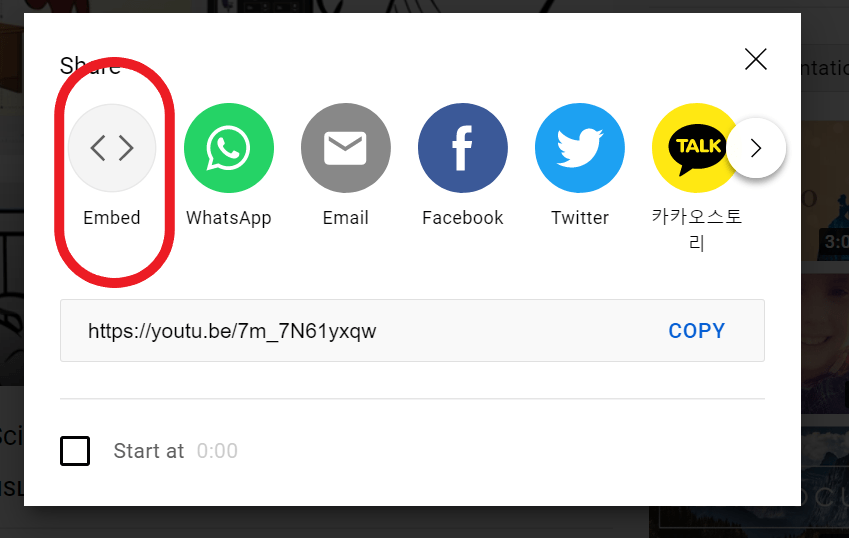
To embed a video in your website you will have to find the option to insert a HTML box. Then go to YouTube and click the share button below the video. This will bring up a box where you should select the “Embed” option and copy the code into the html box on your website.
The second option for adding a video to your website is a bit simpler but not offered by all the website builders. You might be able to simply add videos by inserting a video box and copying the YouTube link into it.
A video is just another name for a scientific presentation
In this article, I showed you some useful tools and principles for creating scientific videos. What you need now are ideas for making them interesting enough that they would capture the interest of people. I have created a course that will allow you to do just that.
Creating science videos and delivering powerful presentations have a lot in common. In the online course “Scientific Presentation Skills“, I will show you how to become a convincing presenter one skill at a time using the Five S presenting pyramid.

The Five-S pyramid starts from the basics of putting together the presentation Substance (first S), advances to devising a presentation Structure (second S), shows how to put up a Show (third S), tell memorable Stories (fourth S), and finally, it will offer advice for how the Speaker (fifth S) can work on improving presenting skills, including dealing with stage fright.
Author

Hey! My name is Martins Zaumanis and I am a materials scientist in Switzerland (Google Scholar). As the first person in my family with a PhD, I have first-hand experience of the challenges starting scientists face in academia. With this blog, I want to help young researchers succeed in academia. I call the blog “Peer Recognized”, because peer recognition is what lifts academic careers and pushes science forward.
Besides this blog, I have written the Peer Recognized book series and created the Peer Recognized Academy offering interactive online courses.